Fade Into Background Fade Into Background Funny Animated Gif
How to Create an Blithe GIF With Fading Effects in Photoshop

This commodity has been moved to Medium from Diana Urban'southward author website to keep it focused on book-related content. If you're interested in reading thrillers with a twist, cheque out her website to snag a free brusque story .
Animated GIFs are all the rage. And if done well, they can be a classy fashion to show off a product if y'all take limited real-estate to work with on a website, your Facebook page, or fifty-fifty in an email.
For example, terminal week my company HubSpot launched a new production. I'grand in charge of our email marketing, and wanted to send a promo email announcing this production launch. Wanting to keep the email brusk while conveying the awesome features, I created an animated GIF in Photoshop that used a fading issue to make the image look like a video of how the product works.
Here's what it looked similar:

I've started creating animated GIFs to promote several of our costless offers besides, which have been used on our landing pages, blog posts, and emails. Creating the fading effect in Photoshop is easier than you might think. Here's how to create an animated GIF in Photoshop that uses a fading effect.
one. Create 1 layer per animation
In the instance above, I take a background epitome plus iv images that fade in and out. I created a separate layer for each of those iv images, and labeled them clearly and so I can easily select the right ones afterwards. For now, choose the layers that you lot want to show by default, when someone first looks at this GIF.

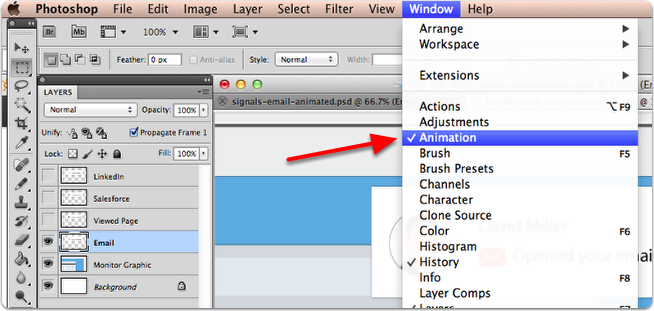
2. Show the animation window
In the top navigation bar, select Window > Animation.
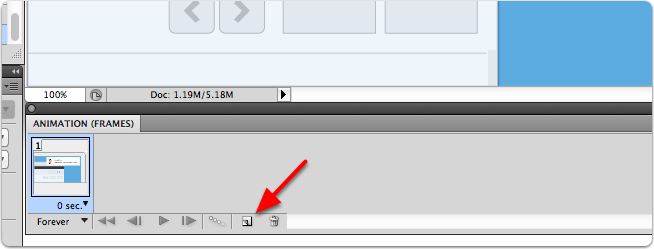
iii. Add a new frame for the first animation transition
By default, there will be 1 frame in your animation. This frame will include any layers that you currently have selected. Click the new frame button in the animation pane.
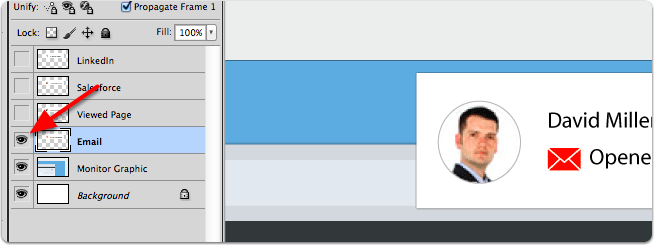
4. Select the layers you want shown in your 2nd frame
Brand sure this new frame is selected, and then get to your layers pane. Select the layers y'all want to evidence up in the 2d frame of your animation by toggling the little eyeball next to each layer on or off. You can add layers, decrease layers, or exercise both.
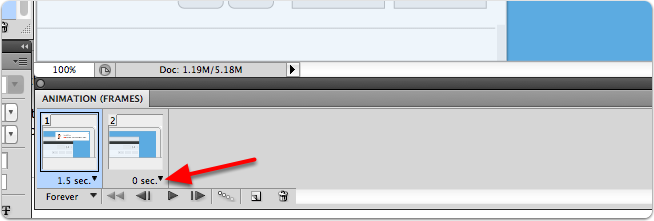
5. Edit the timing of each animation frame
Click on the arrow next to the default timing below each blitheness frame, and select how long yous want each frame to last. If you want to set up a custom time that'southward not shown in the listing or recommended times, select Other and enter a time in seconds. If you click the play push button at the bottom of the animation pane, you'll meet a preview of your animation. The blitheness volition flip from one frame to the next without a smooth transition.
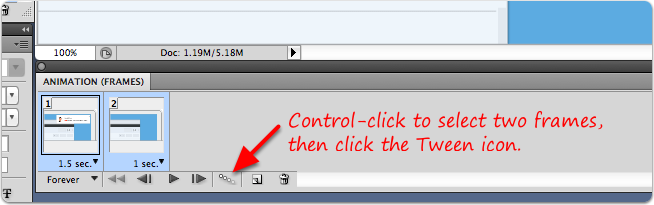
6. Add the fading issue
Calculation the actual fading upshot is simple. First, select the ii frames you want to add the fading transition between (control-click each frame). You can also add together the fading transition between multiple frames by shift-clicking on multiple frames. Once you accept your frames selected, click the tweening icon (information technology looks like little boxes fading to the correct).
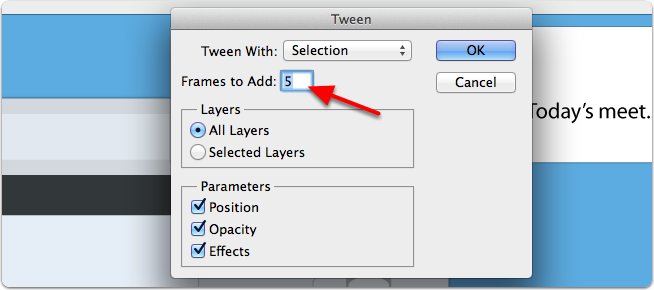
Tweening ways that you're adding frames between your existing frames that add a fading transition between those frames. I like to add five frames for a smooth transition. Y'all can experiment with adding fewer or more frames if you'd like. Then click OK.
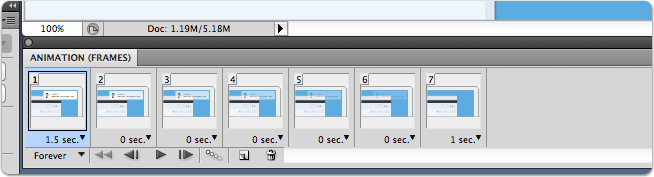
7. Customize the timing of your transition
Shift-click all five of your tween frames, and then click on the fourth dimension beneath 1 of the frames. Select 0 seconds for the smoothest fade transition.

8. Preview your blitheness
Click the play button at the bottom of the animation pane to see what your fading animation looks like. Once you edit the timing of your tween frames, your blitheness pane should look similar this:
9. Save your blithe GIF
In the top navigation, click File > Save for Spider web & Devices. From the file type drop-down carte du jour, select GIF. And so save your image.

That's it!
Source: https://medium.com/@DianaUrban/how-to-create-an-animated-gif-with-fading-effects-in-photoshop-d36b30e0d934
0 Response to "Fade Into Background Fade Into Background Funny Animated Gif"
Postar um comentário